How To Stain And Finish Wood Veneers For Dummies
Wood Veneer Factory Outlet.com
Wood veneer sheets are real wood. You stain and finish wood veneers exactly the same way that you stain and finish real wood.
You will usually stain or finish your wood veneer after it is glued down, but you can apply your stain or finish before gluing if you choose.
Sanding Wood Veneers 101
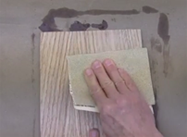
 You may need to sand your veneer when you apply a finish or a wood stain. However, most of our veneers are pre sanded at the factory and you may not need to do any sanding to the raw wood veneer surface.
If you sand a veneered surface with a heavy grit and act like a gorilla, you could sand right through the veneer! On the other hand, it is surprising how much sanding a veneered surface can take.
The most common mistake that people make when sanding wood veneers is to go too easy or to use too fine of a grit.
Sandpaper comes in different grits. The coarsness of the grit is described by a number. Lower numbers are coarser than higher numbers. A good all around number to start with is 100 grit.
Sometimes the coarsness of sandpaper is described by words like “fine”, “medium”, “coarse”.
A 100 grit would probably equate to “medium”.
When you apply a stain or a finish to a raw wooden surface, you must first get the surface smooth and free of scratches or flaws. Start with a 100 grit and increase to higher and higher grits until your surface is smooth to the touch and free of scratches and imperfections.
If you are using a wood stain and you apply more than one coat, you probably don’t need to sand between coats.
When applying a finish, always sand between coats. Use the same process described above. The object is to get a smooth surface that is free of scratches and flaws before you apply the next coat of finish. With each successive coat of finish, you should sand with finer and finer grits.
Staining Wood Veneers 101
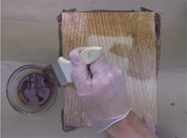
 Wood stains change the tone or color of the wood veneer. You don’t have to use a stain if you don’t want to. One drawback to using stains is that they tend to dull down the luster of the wood. You can use a brush or a clean rag to apply the stain.
The easiest stains to use are the oil based stains and the solvent based stains and that’s what we will talk about here.
Do some testing ahead of time. Wood stains usually darken the wood more than you expect.
First, sand your wood veneer surface smooth. Note: most of the veneers sold on this website are pre sanded at our factory and you may not need to do any additional sanding.
Next, apply a coat of stain to the wood veneer using a rag. Let dry for a minute or two.
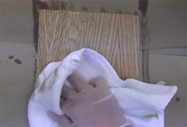
Wipe The Stain Off With A Clean Rag
 Wipe off the excess stain with a clean rag. The longer that the stain stays on the surface of the veneer, the more it will darken the wood.
If one coat of stain doesn’t darken the wood enough, apply a second coat. It probably isn’t necessary to sand between successive coats of stain.
Solvent based stains might penetrate through a paper backed veneer to the glue layer. If you are using contact cement for your glue, this could loosen the contact cement. This warning does not apply to Woodworker’s glue (eg. Titebond, Elmer’s,etc) or to the 3M peel and stick veneers or to the wood backed veneers.
Let the stained surface dry for 24 hours before applying a finish.
Finishing Wood Veneers 101
It is impossible to address all of the different types of finishes that can be used to finish a wood veneered surface.
For the purposes of this article, we will stick to wax, penetrating finishes, shellac, lacquer, water based polyurethane varnish, and petroleum based polyurethane varnish. Our two top choices for finishes: First: petroleum based polyurethane varnish. Second: Water based polyurethane varnish.
Finishing Wood Veneers: Surface Preparation
Regardless of the finish, the wood veneer surface must clean and free of dirt, dust and contaminants. The surface should be sanded smooth and free of scratches and defects. Most of the veneers sold on this website have been pre sanded at our factory and further sanding of the raw wood veneer surface may not be necessary. Refer to “Sanding Wood Veneers 101” in this tutorial, above.

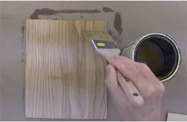
Note: When using a brush, don't skimp! Use a high quality brush when applying finish. Use a NEW brush. After all, you have put a lot of work and effort and pride into your veneering project. Its important to pay particular attention to the finishing process. Types of brushes: Natural bristle brush - Use a natural bristle brush for solvent based finishes. Synthetic brush - Synthetic brushes should be used for water based finishes. Sometimes you will use a rag, such as when you apply a stain. (I even use a rag to apply my first coat of finish, first coat only, when applying a finish.)
Finishing Wood Veneers With Wax
Finishing wood veneer with wax is easy and you get a good looking surface quickly and easily. However, wax finishes give very little protection and successive coats of wax must be applied on a regular basis, forever. Apply the wax with a clean rag, let sit for a minute, wipe off. Buff if necessary. A rule of thumb: Two or three coats at first. One coat a day for a week, one coat a week for a month, one coat a month thereafter.
How Many Coats Of Finish?

Getting a good finish using wax, stain, penetrating finishes and oil finishes is pretty easy. The drawback to wax, stains, penetrating finishes and oil finishes is that the aren't durable. Getting a good finish using Shellac, varnish, or lacquer is tricky. Entire books have been written on how to apply a finish to a wooden surface. When using stains, wax, penetrating finishes or oil finishes, you may need to apply more than 1 coat. Use your judgment. When using shellac, varnish, lacquer, you will need to apply more than 1 coat. It is usually necessary to apply at least 3 coats of finish (shellac, lacquer, varnish, etc.). Always let the finish dry completely before sanding between coats.
Sanding A Finish Between Coats

Sanding between coats is always necessary when using finishes such as varnish, shellac, lacquer. Sanding usually isn't necessary when using stains, waxes and oil finishes. Sand in the direction of the grain ("with" the grain). Use a fine or very fine grit for sanding. If it is necessary to sand against the grain, be sure to follow up by sanding the area "with" the grain.
Some people use a fine steel wool pad. The filaments of the steel wool should be at a right angle to the wood grain. Apply pressure with your hand and push the steel wool pad back and forth, going in the same direction as the wood grain. Be aware that steel wool leaves small shards metal on the surface. It is important to remove all of the residue, especially when using a water based finish that will cause the metal shards to rust.
Finishing Wood Veneers With Shellac

Shellac is an alcohol based finish that goes on easy and dries rapidly. Shellac gives off some fumes. Shellac will give a serviceable finish to your wood veneer surface, but with limited durability. Apply at least 3 coats of Shellac. Brush on the first few coats of shellac. Work in a well ventilated area with low humidity and a temperature of 55 degrees F or higher. Apply light, even coats that go in the direction of the grain. Let dry between coats. Sand between coats. The final coat can be brushed on, but you will get the best results if you spray the final coat using an aerosol spray can
Finishing Wood Veneers With Lacquer
Finishing wood veneers with lacquer is quick and easy. Most lacquers use lacquer thinner as the solvent. Lacquer dries fast but it gives off heavy fumes. Work in a well ventilated area with low humidity and a temperature of 55 degrees F or higher. Lacquer imparts a deep, rich finish that is serviceable, but with limited durability.
Apply at least 3 coats of Lacquer to the veneered surface. Apply light, even coats that go in the direction of the grain. Let dry between coats. Sand between coats. The final coat can be brushed on, but you will get the best results if you spray the final coat using an aerosol spray can.
Lacquers might penetrate through a paper backed veneer to the glue layer. If you are using contact cement for your glue, this could loosen the contact cement. This warning does not apply to shellac finishes or to varnish finishes. This warning does not apply to Woodworker’s glue (eg. Titebond, Elmer’s,etc) or to the 3M peel and stick veneers or to the wood backed veneers.
One way to mitigate the penetration of a lacquer finish is to apply a coat or two of shellac first, then finish off the process with lacquer. Do a trial run first to make sure that the shellac and lacquer will “marry”.
Finishing Wood Veneers With Penetrating Finishes
Penetrating finishes offer a quick and easy method of finishing wood veneers, but they provide limited service and durablility. You will need to apply at least 3 coats of penetrating finish to the veneered surface at first. The luster will soon fade and successive coats will need to be applied to restore the finished look.
Penetrating finishes go by different names, such as tung oil, penetrating oil, penetrating finish, teak oil, etc. Penetrating finishes are petroleum based. Due to high solvent content, penetrating finishes soak down into the wood.
Work in a well ventilated area with low humidity and a temperature of 55 degrees F or higher. Wipe the penetrating finish on with a rag, let stand for a minute or two. Wipe off. Sanding between coats may not be necessary.
Penetrating finishes will probably penetrate through a paper backed veneer to the glue layer. If you are using contact cement for your glue, this could loosen the contact cement. This warning does not apply to shellac finishes or to varnish finishes. This warning does not apply to Woodworker’s glue (eg. Titebond, Elmer’s,etc) or to the 3M peel and stick veneers or to the wood backed veneers.
Finishing Wood Veneers With Water Based Polyurethane Varnish
Water Based Polyurethane varnish is a good choice for finishing wood veneers. It dries quickly and it gives a lasting, durable, finish that resists stains, abrasion, water marks and some chemicals. The clean up is with water, there are little to no fumes, and you can work in a closed area. The one drawback to water based polyurethane is that it doesn’t give the luster or patina that a petroleum based polyurethane varnish gives.
Work in a low humidity environment and a temperature of at least 55 degrees F. Apply the first few coats with a brush. Apply light, even coats, using brush strokes that go in the direction of the grain. Let dry between coats. Sand between coats. The final coat can be brushed on, but you will get best results if you spray the final coat using an aerosol spray.
Finishing Wood Veneers With Petroleum Based Polyurethane Varnish
Petroleum based polyurethane varnish is our number one choice for the home crafts person for finishing wood veneers. It gives a durable finish to your wood veneer that resists stains, abrasion, water marks, and some chemicals. It imparts an amber luster to the wood veneer surface that rivals or equals lacquer.
Work in a low humidity environment that is well ventilated and at a temperature of at least 55 degrees F. Apply the first few coats with a brush. Apply light, even coats, using brush strokes that go in the direction of the grain. Let dry between coats. Sand between coats. The final coat can be brushed on, but you will get best results if you spray the final coat using an aerosol spray.
Bob Morgan, Pres.
Wood Veneer Factory Outlet.com
